The magic behind Susan Pevensie’s props
If you're a fan of Susan Pevensie's iconic look from The Chronicles of Narnia films, you've likely admired her quiver, bow, and arrows. These props are stunning on screen, but, as with many movie details, there's more to them than meets the eye. The intricacies of how movie props are created and used are often overlooked, so we're here to share what we've uncovered after countless hours of research into Susan's gear. It’s going to be a long one, so sit back, grab some hot chocolate and let's dive in!
Susan’s props
Arrows
Let’s begin with Susan’s arrows. Each arrow is different, to create variety. The shaft varies a lot for example, often painted in a rich gradient of earthy browns. It begins with the deepest, almost ebony tones near the arrowhead, gradually transitioning to lighter, softer browns as it approaches the fletching. This subtle ombré effect not only adds visual depth but also enhances the graceful silhouette of the arrow in motion.
Three bands of gold wire wrap around the shaft—two shorter ones nestled between the base of the feathers, and one longer one just beneath them. These gold accents gleam subtly in the light. The fletching itself is composed of sharp, sleek feathers in a vibrant red, chosen to match The Narnian theme troughout the movies. At the top edge of these feathers are thin, decorative gold pieces intended to add further elegance. However, these gold trimmings were not always securely painted, and in several scenes across the films, brief glimpses of them peeling or shifting can be spotted.
The nock of the arrow is kept simple, but it too is adorned with delicate threads of gold, maintaining the overall theme of refinement. The arrowhead is truly unique: shaped like a leaf and subtly crafted to resemble Aslan. For the movies, these arrowheads were constructed using eather gold painted resin or metal, resin for lightweight and mass production practicality during filming, and metal for more detailed close-up shots (HERO version)

On-screen, Susan’s arrows appear normal in length about 70 cm but behind the scenes, things were far more complicated. Susan’s quiver (the one Anna Popplewell, Susan’s actress, used) is quite small and bent, meaning full-length arrows wouldn’t fit. To work around this, the production team created smaller arrows with a sponge to hold them in place. On top of that, her arrowheads can be taken off so the arrows can fit even better.
You can even catch Anna accidentally pulling out these small arrows—a little behind-the-scenes magic at work!
Bow
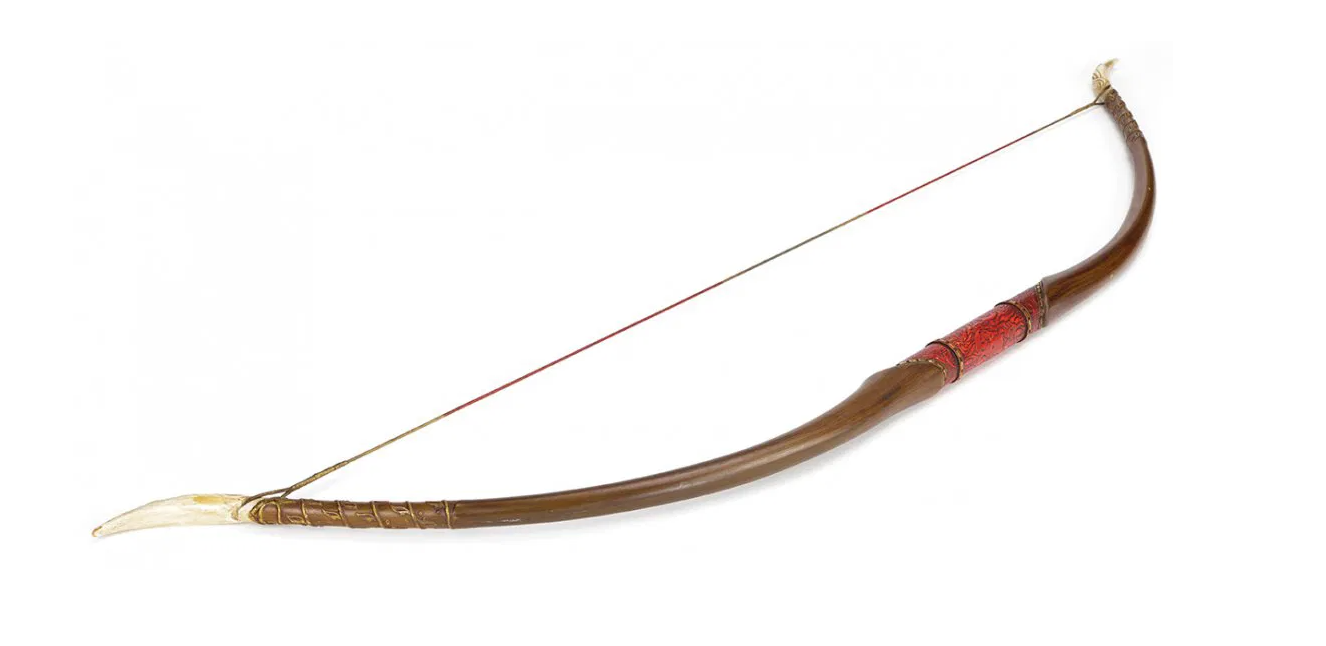
Susan’s bow is perhaps her most iconic weapon—instantly recognizable and deeply symbolic of her character. The bow’s design mirrors the same earthy elegance found in her arrows, creating a harmony between the two. The color scheme is especially striking, featuring a similar gradient that look like natural wood tones. At the center, around the grip, the paint is darker. From there, the color gradually lightens along the limbs of the bow, transitioning into softer, warmer browns as it stretches toward the tips.
The outer tips of Susan’s bow curve gracefully, adding a refined elegance to its silhouette. These tips are finished in a smooth, ivory-white tone that contrasts beautifully with the rich browns of the wooden limb. Etched delicately into the ivory are motifs of leaves and, at the center of each tip, a single daffodil—Susan’s signature flower.
Just beneath the ivory tips, engraved sections decorate the bow’s limbs, filled with fine gold wirework that spirals around in carefully placed bands. Small, stylized leaves are etched into these sections, as though nature itself has wound its way into the weapon.
At the transition point—where the engraved detail ends and the ivory tip begins—the familiar gold rectangle detailing returns, tying the design together and creating a visual echo of the handle’s embellishments.
The bowstring itself adds yet another layer of richness to the design. Rather than a plain or utilitarian string, Susan’s bow features a multi-toned red string interwoven with subtle variations in shade. At the center and ouer parts, a gold serving wraps tightly around the string, reinforcing the area while introducing a striking contrast. This touch of gold not only complements the other golden accents found throughout the bow but also adds a hint of regality.
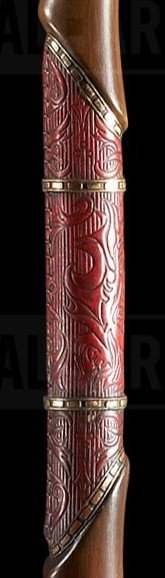
The handle of Susan’s bow is where craftsmanship and symbolism truly shine. Intricately detailed, it features a bold and vibrant red base—a color that stands out against the natural wood tones of the bow. Adorning the handle are elegant gold rectangular accents, a recurring motif in her wardrobe that ties her weapon into her royal identity.
Much of the handle’s ornamentation draws inspiration from Narnian themes. Leaf patterns, symbolic of nature and renewal, are delicately placed and painted throughout the grip. Most striking, however, is the depiction of Aslan, with his flowing mane subtly integrated into the design.
On the reverse side of the handle, a faux stitch line has been added to give the illusion that the grip is wrapped in leather, though in reality, it is a solid sculpted piece. This clever detail adds a layer of tactile realism.
One fascinating detail about Susan’s bow is that it was sometimes made to be fully functional, complete with a working bowstring. For certain scenes, the production team used a real, functioning bow to ensure the movements and tension looked authentic on screen. This added an extra layer of realism, especially during close-up shots where Susan is seen drawing the bow or preparing to shoot.
One common misconception about Susan’s bow—and her props in general—is its size. Compared to a traditional medieval English longbow, her bow is noticeably shorter. However, this wasn't a design oversight but a deliberate choice. The shorter length made it far more practical for Susan’s fighting style, allowing for quicker draw times and greater maneuverability, especially in close or fast-paced scenarios. Rather than being built for long-range siege warfare, her bow was ideal for rapid, mid-range engagement—perfect for an agile, instinctive archer who fought with speed and grace rather than brute force.


For scenes where Susan’s bow needed to be stored in her quiver a specially designed, scaled-down version of the bow was created for practical filming purposes. Much like the arrows, a full-length bow simply wouldn’t fit or sit comfortably in the quiver, especially during dynamic movement or action scenes. This shortened version retained all the key design elements of the full-sized bow ensuring visual continuity on screen. While it wasn't functional as a real weapon, it served perfectly as a background prop, maintaining the illusion that Susan was always fully equipped, even when her bow wasn’t actively in use.
Horn
Susan's horn may be small in size, but it plays a monumental role in the Narnia series, both symbolically and narratively. Its design is masterfully crafted, featuring a graceful, curved shape that feels both functional and symbolic of the character's connection to the land of Narnia. The front of the horn is adorned with a beautifully detailed rendition of Aslan’s face, his mouth open in a mighty roar. This roaring expression seems to come to life with the curve of the horn. His mane flows seamlessly around the opening, completing the impression of his fierce and protective spirit.
The back of the horn features a stunning silver-colored floral mouthpiece, a delicate yet bold contrast to the more dramatic lion’s face at the front. This floral detail, like the other elements of Susan's gear, brings a sense of elegance and softness to the otherwise powerful design. The same rectangle patterns that run through her bow and quiver also make an appearance here, wrapping around both the front and back of the horn.
At the top of the horn, you’ll find a series of metal strap connectors—functional yet visually intricate pieces that serve both practical and decorative purposes.

Alongside the horn, Susan had an exclusive strap designed just for it—a thinner, more delicate piece compared to the quiver strap, yet every bit as detailed, if not more so. This strap is an intricate masterpiece in its own right, adorned with exquisite floral and leaf patterns. Of all the straps in the Narnia movies , this one the most detailed patterns created for the films, making it a standout feature that often goes unnoticed.


The buckles fastening the strap are just as ornate, plated in metal and designed with the same leaf-and-flower motif that flows throughout her other gear. These buckles are transformed into small sculptural pieces—curved, delicate, and etched with such fine detail that they seem more like jewelry than functional hardware. Their elegant form adds a regal touch to the ensemble, reinforcing the idea that Susan’s equipment is not just practical but also imbued with a sense of nobility.
At the end of the strap, where it connects to the horn, the buckles take on a more natural form. Shaped like leaves, these smaller fastenings are attached with simple yet secure clasps, maintaining the organic, nature-inspired design while ensuring the horn remains safely strapped to her side. These small yet meaningful details further elevate the horn and its strap as a symbol of Susan’s royal lineage and connection to the enchanted world of Narnia.
Quiver
Susan’s quiver, while relatively simple in shape, is packed with intricate detailing that elevates it far beyond a standard prop. Its overall form curves gracefully, mimicking the natural bend of a tusk or horn—as if it were carved directly from one, smoothed and hollowed into the elegant quiver seen on screen. This shape not only adds a unique silhouette but subtly ties the piece into the natural world of Narnia, giving it an almost mythical origin.

The quiver can be visually divided into two main sections: the top and the bottom. The top is lavishly adorned with delicate motifs of leaves and daffodils. At the front, her initials, “SP,” are proudly displayed in silver. On the back of the top section, more leaf patterns continue to wind their way across the surface, accompanied by a beautifully rendered top-down view of a single large daffodil. This daffodil motif repeats again along the inner rim of the quiver’s opening. Wrapping around these floral designs is a recurring rectangle motif.

Moving to the lower section of the quiver, Aslan himself is depicted with his flowing mane, carved or embossed with reverence and detail. Surrounding the great lion are swirling vine-like patterns and more leaves, creating a feeling of life and movement. Beneath this, the gold rectangle pattern returns again, acting like a decorative border that grounds the whole design. On the back of the bottom half, that same rectangle motif repeats once more, but this time joined by round, metallic silver floral details. These circular silver accents add a different visual texture and a subtle pop of contrast, making the quiver feel both battle-ready and beautifully ceremonial.

Even the quiver strap is nothing short of a masterpiece in its own right. Far from a simple leather strap, it’s richly detailed with an engraved pattern that runs the length of the strap—an elegant arrangement of intertwined flowers and leaves that mirrors the natural motifs found throughout Susan’s gear. The floral design is pressed deep into the leather, giving it both texture and visual depth.

The buckles are the same as the horn strap buckles but bigger to make room for the wider strap!

Changes Troughout The Movies
By now, it's clear that an incredible amount of detail went into crafting Susan’s props—but what many people might not realize is just how much these items evolved between the two films. While the core themes and design language remained consistent, the bow, arrows, quiver, and even the smallest embellishments underwent notable changes—sometimes for practical reasons, and other times as a reflection of Susan’s growth and the shifting tone of the story. These differences may go unnoticed at a glance, but when looked at closely, they reveal a fascinating progression in craftsmanship, storytelling, and character development across The Lion, the Witch and the Wardrobe and Prince Caspian.

In The Chronicles of Narnia: The Lion, the Witch, and the Wardrobe, Susan’s quiver was designed in a striking white color, symbolizing the purity and newness of her role as an archer and warrior in Narnia. The straps that are attached to her props are a very bright red with gold accents along the edges. This pristine look perfectly reflected the innocence and hope of the Pevensies first journey into the magical land.

By the time we see Susan in Prince Caspian, the quiver’s design evolved to reflect the Pevensies growth and the challenges they had faced. The once-bright white quiver had darkened to a weathered ivory color, her belt has also turned a more darker red color with no gold accents symbolizing their adventures and the passage of time.
Susan’s horn, like her quiver, underwent the same transformation from white to the dark ivory color*
Belt System
One of the most intricate and well-thought-out features of Susan’s gear in The Lion, the Witch, and the Wardrobe was the system that allowed her horn strap to attach directly to her quiver. This design ensured that both essential items—her quiver and magical horn—were easily accessible while staying securely in place during movement and action scenes. The attachment system was seamless and cleverly integrated, highlighting the attention to detail in the film’s prop design. By connecting the horn strap to the quiver, the filmmakers achieved a functional and aesthetically pleasing solution that added practicality to Susan’s gear while keeping her overall look cohesive and elegant.

After countless hours of research and analysis here’s what we found: The horn strap is a two-part system that cleverly weaves through the quiver belt to stay secure. One part of the horn strap starts out over her shoulder. On the opposite side, the strap exits again.The second piece of the horn strap only wraps around the front of the torso. It connects to the first piece using the same style of buckles used for the quiver. The back of this second piece runs through the quiver’s buckle system, allowing it to align perfectly and meet the horn itself. It’s a brilliant system that reflects the incredible thought and craftsmanship of the prop designers—both practical and aesthetically stunning!
There were also a few extra components added to the strap system to ensure both function and accuracy. On the front, a leaf-shaped clasp secures the overlapping top straps, acting as a stylish yet practical detail that pinches them together. In addition, several small leather loops are scattered throughout the system to keep everything tight and secure. Without these, the straps would flap around—so these subtle additions help maintain the clean, structured look while staying true to the overall design.
How We Recreated Susan’s Props
Creating Susan's props was no easy task. Her intricate details props like the quiver, bow, and various other elements such as buckles and straps posed a significant challenge and took a great deal of time and effort to perfect. Ultimately, though, every component we recreated is incredibly accurate. From the overall prop designs to 1:1 strap patterns we eteched onto our leather, every single detail mentioned above has been faithfully included. Knowing this let’s get into the induvidial props.
Arrows
The arrows were fully recreated with complete accuracy. The wooden shaft is painted in multiple colors to replicate the original gradient, and all details—from the feathers and cords to their precise placement—match the source exactly. The nock is cast in resin, while the golden arrowhead is first plated in metal, then finished with a gold coating. We also kept the length of the arrows consistent with the original design. Arrows are available for purchase separately in our shop, in quantities from 1 to 8.
Bow
With a fully accurate design as our foundation, we decided to take things a step further with the bow. We created a half-functional version that can be drawn back—but without any real force—making it perfect for posing or simulating an aiming stance without the risk of actual use. The bowstring is also true to the original, crafted in two tones of red with detailed gold serving for that authentic look.
Horn + Srap
With a fully accurate design, we made sure to go the extra mile. The pieces where the horn strap attaches is made from metal—just like the mouthpiece—for both durability and authenticity. Just like in the movies the horn is available in 2 color variants. The horn strap itself features a 1:1 accurate pattern, complete with gold-coated buckles that match the original design exactly. The horn and strap are available for purchase seperately in our shop.
Quiver
A beautifully sleek design that we fully recreated, the quiver is available in two color variants—just like in the movies. It features the signature "SP" emblem in metal, staying true to the original look. The strap includes a 1:1 accurate pattern and is finished with gold-coated buckles for that final authentic touch. Just like in the films, we've included an seperate arrow sponge to keep the arrows securely in place. Since our arrows are full-length for screen accuracy, the quiver holds approximately 6 to 8 arrows—slightly fewer than the 7 to 11 Susan typically carried—allowing us to preserve the correct lenght without cutting them in half. The quiver is available seperately in our shop.
Susan Pevensie’s Full Set From Father Christmas
For the first time ever, we’re offering the option to purchase Susan’s entire prop set together—just like Father Christmas gave it to her. Every prop, buckle, and detail is included, bringing her full gear into one complete package. Alongside this, there's also the option to include the full belt system as seen in the films. With our recreated props, you’ll truly get the full Susan experience.
There’s rarely a perfect way to explain these nuances, that’s why we’re thrilled to dedicate a page on the website to these fascinating behind-the-scenes facts. It’s important for fans and collectors to understand the details so they know what prop they want to buy and how it works!
Stay tuned for more insights into prop-making, and thank you for supporting our work as we bring these iconic pieces to life!